
How to run ADB shell commands via
your browser without installing
drivers - WebADB
Android Smartphones are popular among custom developers because of the ability to modify or control as we want. And ADB is a powerful tool that allows users to connect smartphones with computers for basic as well as advanced functions. But for that, you need to install ADB and specific OEM drivers. But now you can use ADB directly from the web with WebADB. Here you will know how to use WebADB for various ADB functions.

WebADB allows users to perform many ADB operations but it is not capable of high-level ADB tasks. You can easily perform basic functions such as shell commands, File Manager, Control device, and more.
ADB or Android Debug Bridge is a command-line tool that lets you interact with your phone using a computer. It allows you to perform tasks like debugging apps and more. And WebADB also lets you perform the same task without installing the driver. This is going to make most of the processes easier such as sideloading an APK, Screen Recording.
Here are all the features that are available on the WebADB:
- Apk installation
- Interactive shell
- Screen Recording
- SCRAPPY – Control your device from your browser
- Device Information
- File Manager
- Enabling ADB over WIFI
How to use WebADB
All thanks to a developer and an XDA forum member steeltoe for this great platform. WebADB uses and its functions are also easy. But as it is new, you might need some guidance to use it without any problem. So here we are going to share a guide on how to use WebADB to control your phone using a computer.
Before we head to the steps, make sure you are using the latest version of Google Chrome, Mozilla, and Microsoft Edge. I have tested on Google Chrome and it works flawlessly. And also yes, you can use it on Windows and other platforms. Let’s now jump into the detailed guide.
1. Search for chrome://flags/ on your Chrome browser and search for USB and enable new USB backend.

2. Enable Developer Options on your device and open Developer Options from Settings.
3. In the developer options, enable the USB Debugging option.
4. Now open the link https://webadb.com/ on your preferred browser.

5. Then connect your phone to the computer using a USB cable.
6. After connecting the device, click on Add Device and it will show the available device in a popup, Select your device.
7. If your device asks for permission then allow it.

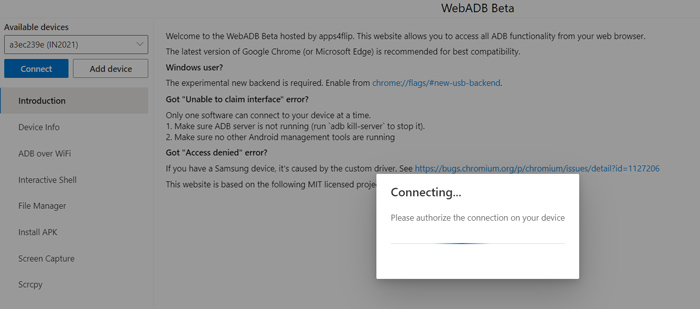
In the Introduction tab, you can check the guide to connect your device. And you can access it without connecting to your phone. Also, it has solutions for some common errors.
Device Info – This section will show the information about the connected device. The information includes the device name, Model, features.
ADB over WiFi – This section will let you enable ADB over WiFi. But you can not use WebADB for devices connected wirelessly so it will disconnect after enabling ADB over WiFi.
Interactive Shell – In this tab, you can use all the basic shell commands to interact and make changes on your device. Here are some ADB commands that you may find useful.
File Manager – It will let you access all the files and folders of your smartphone directly from the computer. It comes in handy for many tasks.
Install APK – If you want to sideload any apps that are stored on your computer then you can use this section for installing the app.
Screen Capture – In case if you want to take a screenshot of your phone during any activity then you can use the screen capture option.
Scrappy – This feature on WebADB lets you control your device directly from your computer. You can perform any operation from this section. As it is still considered as beta, so you may find it buggy.
So there you have it, the guide on how to use WebADB to control your device. In case if you have any queries then let us know in the comment section below.
إرسال تعليق